
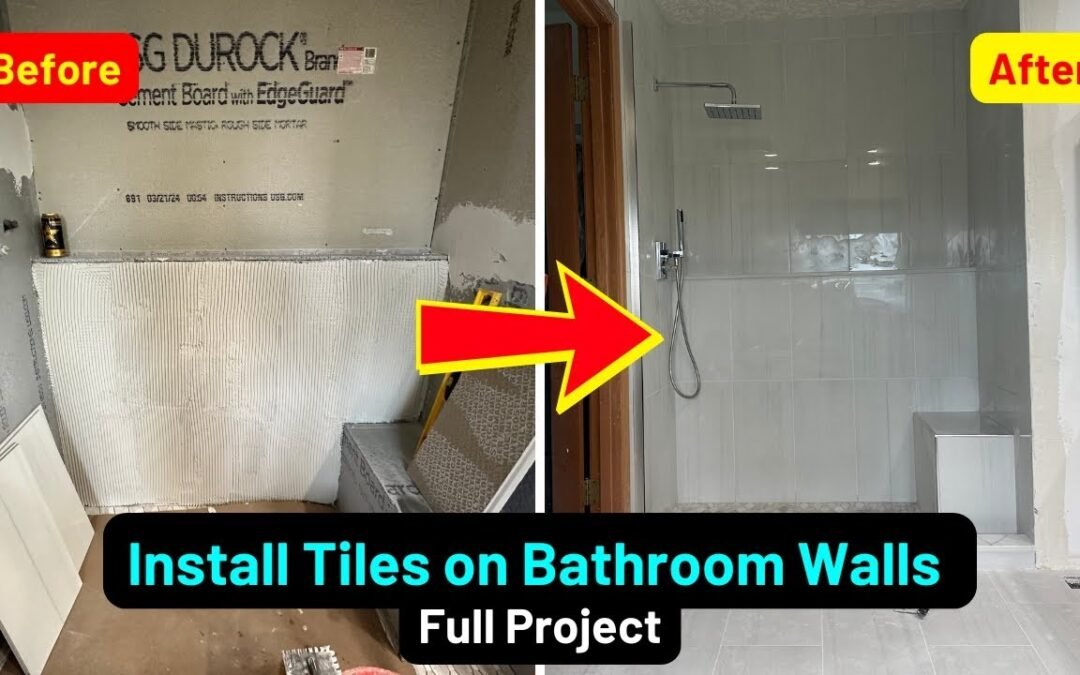
Transforming your bathroom with sleek, modern tiles can elevate its style and functionality. In this guide, we’ll take you through the process of installing 12x24 tiles on bathroom walls. This project by Frank's Handyman Service focuses on proper tile cutting, placement, and spacing to achieve a professional finish. Whether you’re planning a DIY project or simply curious about the process, follow along for a detailed overview.
For a complete walkthrough, watch our video below:
🛁 How to Install 12x24 Tiles on Bathroom Walls: Full Project - YouTube
Materials Needed
- 12x24 ceramic or porcelain tiles
- Tile adhesive or thin-set mortar
- Tile spacers
- Tile cutter or wet saw
- Notched trowel
- Level
- Grout and grout float
- Caulking (for edges and seams)
- Bucket and sponge (for cleanup)
- Measuring tape
- Safety goggles and gloves
Step-by-Step Process
1. Prepare the Surface
Before tiling, ensure that the bathroom walls are clean, dry, and free of debris. For a sturdy installation, apply a waterproof membrane or backer board to the walls, especially in areas exposed to moisture, like the shower.
2. Plan the Layout
Measure the walls to determine the tile layout and ensure even placement. Start from the center of the wall and work your way outward to maintain symmetry. Dry-fit the tiles to visualize the design and mark any areas that will require cutting.
3. Mix and Apply Tile Adhesive
Using a notched trowel, spread a layer of thin-set mortar or tile adhesive onto a small section of the wall. Work in sections to prevent the adhesive from drying before you can place the tiles. Hold the trowel at a 45-degree angle to create ridges in the adhesive for better tile adhesion.
4. Place the Tiles
Begin placing tiles, starting from the bottom center and working your way up. Use tile spacers between tiles to maintain consistent grout lines. Check each row with a level to ensure they are straight and evenly spaced.
5. Cut the Tiles as Needed
For edges and corners, use a tile cutter or wet saw to trim tiles to the required size. Smooth any rough edges with sandpaper or a file. Place the cut tiles carefully to maintain the overall design and alignment.
6. Install the Backsplash
For the backsplash, repeat the same process of applying adhesive, placing tiles, and using spacers. Make sure the tiles align seamlessly with the rest of the wall.
7. Grout the Tiles
Once the adhesive has cured (typically 24 hours), remove the spacers and apply grout using a grout float. Spread the grout diagonally across the tiles to fill the gaps. Wipe off excess grout with a damp sponge, being careful not to remove too much from the seams.
8. Seal the Edges
Apply caulking around the edges where the tiles meet the ceiling, floor, or other surfaces to ensure a watertight seal.
Pro Tips
- Use spacers consistently: This helps achieve clean, uniform grout lines.
- Work in small sections: Prevent adhesive from drying out by tiling one area at a time.
- Clean as you go: Wipe off excess grout before it hardens for easier cleanup.
- Use quality materials: Invest in durable tiles and waterproofing products for a long-lasting installation.
Video Walkthrough
For a visual guide, watch our video below, where we demonstrate the entire process:
Conclusion
Installing 12x24 tiles on your bathroom walls is a rewarding project that can significantly improve your space. With the right tools and techniques, you can achieve a polished, professional look. If you’d rather leave it to the experts, Frank's Handyman Service is here to help with all your tiling and home renovation needs.
Call us at (503) 522-2672 for a free estimate or visit our website to learn more about our services.
